https://aws.amazon.com/getting-started/hands-on/get-a-domain/
with Amazon Route 53
In this tutorial you will register a new domain name for your website. You will then connect that domain name through the Domain Name System (DNS) to a currently running EC2 instance (such as a WebApp, or website running WordPress, Apache, NGINX, IIS, or other Website platform). If you already have a domain name registered, do step 1 and then refer to your domain registrar’s documentation for how to set the DNS record for your new site.
Cost implications:
There's an annual fee to register a domain, ranging from $9 to several hundred dollars, depending on the top-level domain, such as .com. For more information, see Amazon Route 53 Pricing for Domain Registration. This fee is not refundable.
When you register a domain, we automatically create a hosted zone that has the same name as the domain. You use the hosted zone to specify where you want Amazon Route 53 to route traffic for your domain. The fee for a hosted zone is $0.50 per month. You can delete the hosted zone if you want to avoid this charge.
Want to get hands-on and Register a Domain Name?
Create a Free Account in MinutesReceive twelve months of access to the AWS Free Usage Tier and enjoy AWS Basic Support features including, 24x7x365 customer service, support forums, and more.
Note: If you are using Elastic Load Balancing (Elastic Load Balancing is done automatically if you launched your app with Amazon Elastic Beanstalk) then you do not need to obtain a static IP address and can go directly to step 2.
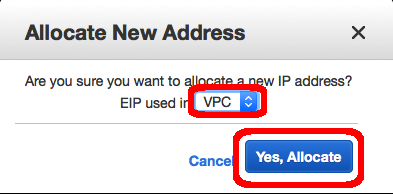
a. Click here to open the Elastic IPs part of the EC2 console in a new window and click Allocate New Address.
b. Set EIP used in: to VPC and click Yes, Allocate.
Note: There is no charge for Elastic IP addresses (EIPs) that are connected to running instances. If you remove the instance (e.g. the EIP is no longer connected to a running instance) then there is a cost of $0.005/hr for the EIP).
e. Click in the Instance text box and choose the option that has your instance name.
Note: in the WordPress tutorial we named this machine WordPress.
Now that you have an IP address associated with your instance, we will need to configure the Domain Name System (DNS) to point to this address so that people can find your website.
Note: In this example we will be acquiring a new domain name and associating it with the Elastic IP address we just created (which is attached to your instance). If you already have a domain name, or if you choose to use another domain registrar to get a domain name, please refer to their documentation on configuring DNS for your instance.
a. Click here to open the Route 53 console in a new window (Route 53 is AWS’s DNS service). You can register new domain names with Route 53 as well as manage DNS records for your domain.
Select Get Started Now under Domain Registration.
b. Click the Register Domain button. On the next screen, enter the domain you want in the Choose a Domain box (cloudexamples is shown in the image, then select a Top Level Domain (TLD) (e.g. .com, .org, .co.uk, etc.) And click the Check button to see if the domain is available. If the domain is available, click the Add to cart button and scroll to the bottom of the page to click Continue.
Note: Domains are not part of the free tier so you will be charged for any domain you register.
e. If you registered a domain that has a generic top-level domain (such as .com), you'll receive an email that asks you to confirm your email address. (We don't send an email if we already have confirmation that the email address is valid.)
You must follow the link in this email to confirm your email address, or the domain won't be registered.
For all domains, you'll receive an email when your domain registration has been approved.
Note: it can take a few minutes for the system to confirm the registration of your new domain.
Our last step is to configure the DNS so that the new domain we created in step 2 can point to the address we have for our server. This can be the static IP address (from step 1) or a fully qualified domain name (FQDN) that is automatically created if you are using Amazon Elastic Beanstalk.
a. Open the Hosted Zones part of the Route 53 console by clicking here. Next, click on the domain name you created in step 2 (in this example we are using cloudexamples.com but your domain will be different).
Below are Tabs to help you choose the scenario that is most applicable to you.
If you have a static IP address for your website, virtual server, or service; select Static IP Address below.
If you have a Fully Qualified Domain Name (FQDN) for your resource (this is common for applications launced by Elastic Beanstalk, Lambda functions, S3 static sites and more advanced deployments using Elastic Load Balancing) please select Fully Qualified Domain Name (FQDN) below.
d. Verify that your website is now available at your new domain by typing your new website address into your web browser.


No comments:
Post a Comment