JS:
https://medium.com/the-z/making-a-resizable-div-in-js-is-not-easy-as-you-think-bda19a1bc53d
Angular:
https://medium.com/swlh/create-a-resizable-and-draggable-angular-component-in-the-easiest-way-bb67031866cb
A resizable and draggable HTML div element can add more possibilities into your website by allowing you to make more flexible components, such as a draggable back-to-top button, a resizable calendar, a movable video window and etc.
In this post, we will go through the process of making a resizable and draggable component step by step with less than 100 lines of code. The structure of this article is shown below:
- Create a resizable component
- Make the component draggable
- Add boundary restrictions into moving & resizing actions
View details in my github repo: angular-resizable-draggable.
1. Create a resizable component
1.1 Component Initialization
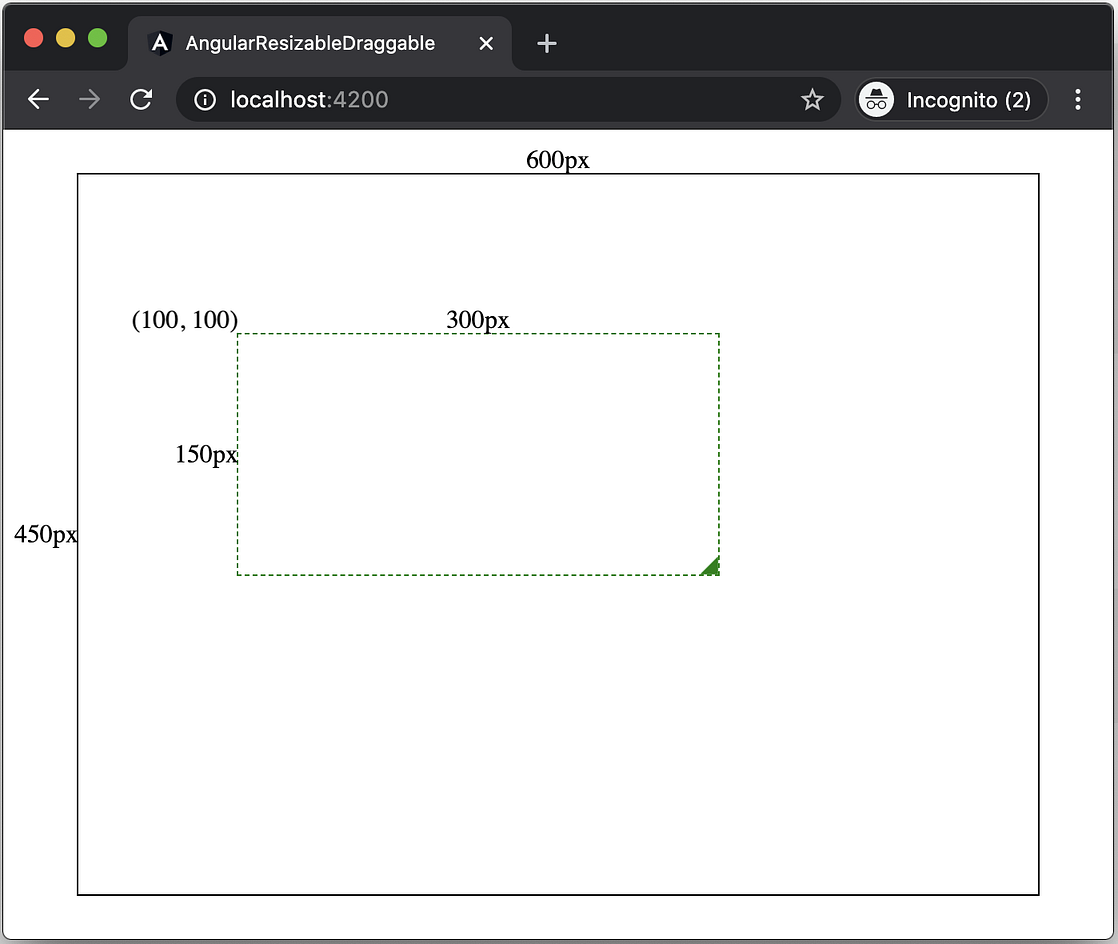
As part of the initial settings, I have initialized an Angular project with a 600x450px container for the component we are going to make.
After that, we need to initialize a resizable-draggable component and pass some initial @Input values into the component, and bind them with the component’s style.

app.component.html
<app-resizable-draggable
[width]="300"
[height]="150"
[left]="100"
[top]="100">
</app-resizable-draggable>
resizable-draggable.component.ts
@Input('width') public width: number;
@Input('height') public height: number;
@Input('left') public left: number;
@Input('top') public top: number;
resizable-draggable.component.html
<div class="resizable-draggable"
[style.width.px]="width"
[style.height.px]="height"
[style.transform]="'translate3d(' + left + 'px,' + top + 'px,' + '0px)'">
   <div class="resize-action"></div>
</div>
1.2 Add resize logics into the component
After component initialization, we need to add some resize logics. The core of resizing is to recalculate the box’s width and height by subtracting the box’s initial x & y coordinates (left and top values) from our mouse’s current X & Y coordinates.
pseudocode: newWidth = mouseX - boxLeft;
pseudocode: newHeight = mouseY - boxTop;
To get the box’s initial X & Y coordinates, we can use Web API getBoundingClientRect().
The
Element.getBoundingClientRect()method returns the size of an element and its position relative to the viewport.
const {left, top} = this.box.nativeElement.getBoundingClientRect();
this.boxSpec = {left, top};
To get our mouse’s current viewport X & Y coordinates, we will need to add a mousemove listener, and use the clientX and clientY values.
@HostListener('window:mousemove', ['$event'])
onMouseMove(event: MouseEvent){
   this.mouse = {
      x: event.clientX,
      y: event.clientY
   }
}
After that, we will need to bind the new width and height to the style variables.
this.width = this.mouse.x - this.boxSpec.left;
this.height = this.mouse.y - this.boxSpec.top;
Resizing Effects

2. Make the component draggable
To make the component draggable/movable, the core is to link your mouse movement to the left & top positions of the current <div> element. We will need to know how many pixels has the mouse moved horizontally and vertically.
To get the horizontal and vertical movement distance, we need to record the position (coordinates) on mouse’s first key-down click, and then compare the new positions with the recorded position.

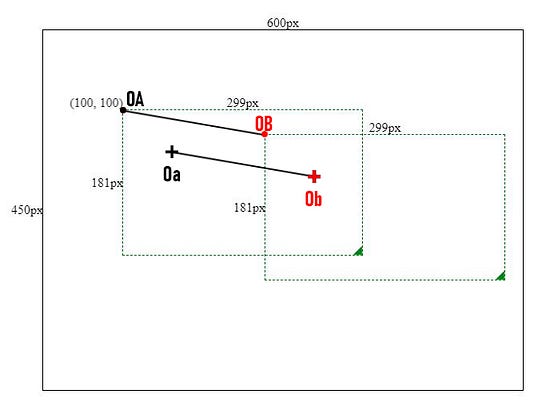
As shown in above image, the distance between OA and OB should be exact the same as from Oa to Ob.
So we need to add a mousedown event to the box and record Oa & OA positions. (x, y) is Oa’s coordinates, and (left, top) is OA’s coordinates.
this.mouseClick = {
   x: event.clientX,
   y: event.clientY,
   left: this.left,
   top: this.top
};
By subtracting Ob’s coordinates by Oa’s coordinates, we will get the horizontal and vertical movements, and then we can add those movements with OA’s coordinates to get the component’s new coordinates.
this.left = this.mouseClick.left +
   (this.mouse.x -this.mouseClick.x);this.top = this.mouseClick.top +
   (this.mouse.y - this.mouseClick.y);
Movement effects

3. Add boundary restrictions into moving & resizing actions
As we can see from last section, the movement and resizing sometimes will go to outside of the container. So we will need to and boundary restrictions to limit our mouse movements.
3.1 Resizing actions’ boundary restrictions
For resizing movements, we need to make sure
1) the mouse’s x & y coordinates should be less than the container’s right & bottom values.
this.mouse.x < this.containerPos.right &&
this.mouse.y < this.containerPos.bottom
2) If the mouse’s x & y coordinates is greater than the box’s left & top coordinates, we shouldn’t apply any changes on the size.
this.width = Number(this.mouse.x > this.boxPosition.left) ? this.mouse.x - this.boxPosition.left : 0;this.height = Number(this.mouse.y > this.boxPosition.top) ? this.mouse.y - this.boxPosition.top : 0;
3.2 Moving actions’ boundary restrictions
To make sure the box won’t go outside of the container, we need to know the offset values between the mouse coordinates and the box’s boundaries.

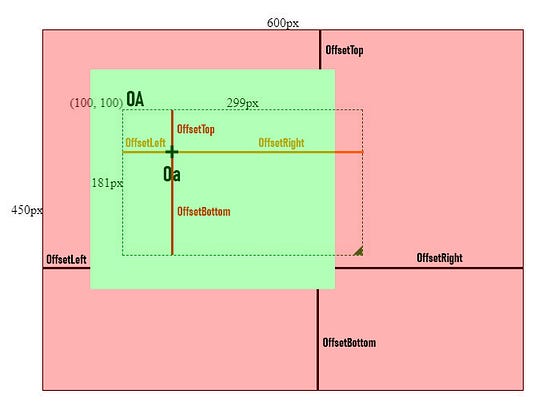
If we click Oa and drag the box, we will see the green area indicating the safe zone for the mouse movements. So the mouse’s coordinates should meet below conditions.
this.mouse.x > this.containerPos.left + offsetLeft &&
this.mouse.x < this.containerPos.right - offsetRight &&
this.mouse.y > this.containerPos.top + offsetTop &&
this.mouse.y < this.containerPos.bottom - offsetBottom
After we applied restrictions for drag and resizing actions. We will see the final effect like below.

Wrapping Up
Making a resizable and draggable component is a lot of fun. Why not make one yourself and try to integrate it with some amazing ideas.
Cheers and thanks for reading!
Other Posts:
- Prerender Angular as static website and host it on AWS S3 with your custom domain
- Deploy Serverless Server-side-rendered Angular on AWS Lambda.
- Be Careful of Passing an Async Function as a Parameter
- JavaScript Async Function Error Handling Is Not What You Think
- Create a Free Serverless Contact Form Using Gmail, Node, and AWS Lambda
- Step by Step Guide to Upgrade Angular App From CSS to SCSS
No comments:
Post a Comment